Head on over to Creating From the Heart for some awesome give a way prizes. You can click the link below for all the info. Hurry because it all ends January 1!! http://keepsakesbymelissa.blogspot.com/2011/12/my-annual-end-of-year-christmas.html
Wednesday, December 28, 2011
Saturday, December 3, 2011
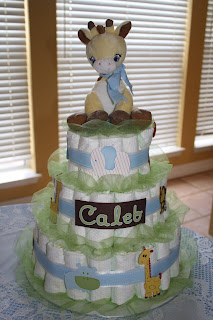
Twins Diaper Cake
A lady at my work is expecting twins! We gave her a baby shower the week before thanksgiving and I was asked to make the diaper cake. Here is what I came up with.

You would think that with all the diaper cakes that I've made this would be easy peasy.......it was probably the hardest one that I made.

I think the challenge was that I didn't have a 'theme' to go by. Usually, I check to see what the nursery bedding looks like and then I go from there. In this case, she was doing ladybugs for the girl and the boy bedding had a turtle, snail, frog, and chick. That totally didn't go together for the diaper cake but the beddings are really cute for the babies!


I opted for a twins theme. Let me tell you.....it was very difficult to find pink and blue grosgrain ribbon in the exact same length! I really wanted more of a baby pink, but this was the closest that I could find!


I used Peachy Keen baby assortment face stamps for the cutouts. They came out super cute!! I also used Car Decals (names), New Arrival, and Baby Steps cricut cartridges.

For directions on how to make a diaper cake, click HERE. If you have any questions, let me know. Thanks for looking!!
Saturday, November 26, 2011
Rag Quilt Blankets
My absence from my blog is due to the busy, busy month of November. Here are two rag quilts that I completed this month for two dear friends of mine.


The second one is for a baby boy. The nursery is in a western theme. When I went to the fabric store I couldn't decide on the prints. I wanted to use flannel, but I could only find the cow print in cotton. I settled for cotton fabrics. They ragged much better, but the blanket is not as soft as the flannel.

My husband found the print that we used on the back. He insisted that we buy that fabric, so I made the back out of one print and the front out of the three prints.

Overall I was pleased with both blankets and the mommies were very glad to have them.
I found a really great tutorial HERE on how to make the blankets. Instead of using 4" squares like she did, I used 6" for my outer layer and 5" squares for my batting. If you have any questions, please let me know. Thanks for looking!!!
Saturday, November 5, 2011
Baby Gifts
Oh, this is a busy time of the year. Baby showers, wedding showers, and they holidays.....oh my they are keeping me busy. I don't mind though!! It's all worth it! I have a couple of projects that I'm working on now and when I get those finished I'll share with you!

For today, I wanted to share a simple baby gift that I put together for a friend of mine who had a baby a while back. It was super simple and easy to make. I purchased an inexpensive 8 1/2" X 11" frame and put my gypsy to work. I used Going Places cricut cartridge for the images and Base Camp for the name. I just used DCWV textured cardstock. Thanks for looking.
Thursday, October 13, 2011
Wedding Shower Favors
I was asked to help with a shower for a girl I go to church with. Being the "shower diva" that I am (LOL) I said sure! They needed me to do some favors. This is what I came up with.

Like I said earlier this week, these pillow box favors are becoming my go-to favors.
Since I am making 100 of these cute little things I found a way to shrink the pillow box favor by cutting it out once from a transparency sheet and then moving the box down a bit and aligning it again on the die and cutting it a second time. HERE is a link to a youtube video that shows what I did. This way I can get 2 of the Hershey nugget treats into the box instead of 3 which is what it will hold when cut regularly.
My sweet hubby bought me the Cricut Flower Shoppe cartridge for my birthday and I couldn't think of a better time to use it. After some youtube research I settled on this flower design.

The spiral cut measures about 2.5 inches wide. The finished flower rosette measures just over 1/2". They are very small, but perfect to put on this tag. I used the scallop 1 cut (see picture below).

Here is a close up of the label that I created using the finished flower.

Monday, October 10, 2011
Teacher Gifts 2011
I'm back! Sorry for the long break but back to school this year has been very busy and hectic!! Things are finally starting to fall into a routine, so I've had a bit more time to do some work and updating.
Every year I make gifts for the teachers in my grade level for 'Back to School.' Teachers always can use a little afternoon pick-me-up those first few days back to school. I decided to put together a little candy snack. I found the little holders at the dollar store and I made everything else (except for the chocolate!! I left that up to the Hershey people!).

This is a regular Hershey bar that is covered in some red cs and dsp from Stampin' Up!

I saw this idea a few years ago in a Creating Keepsakes magazine. I put in into my inspiration binder but forgot about it until a couple of weeks before school started. I stumbled onto a thread post on the cricut mb about these and I knew I wanted to add them to my candy snack. The inside is made up of a pkg of Rolo candy (these were hard to find!! I ended up buying them at the gas station/convenience store and they were the most expensive project of all, but well worth it!!) You could also use a roll of sweet tarts or any other roll candy.

I bought this stamp somewhere a couple of years ago and I thought I would try my hand at coloring it with my Copic markers. I'm still learning how to use them, but I thought they weren't that bad considering!!! I used the Stampin' Up! builder wheels for the black images on the red cs.

These little pillow box treats are becoming my new favorite form of treats. They are super easy to make. The pillow box die is from Sizzix and the stamped images are from a set by Stampin' Up! that is made for this purpose. It fits perfectly onto an Avery label and then wraps wonderfully around the Hershey nugget treats!! Be looking for another favor idea using these same items.

This is a fun bookmark that I made for the ladies. I wrote a little "good luck" message on the back. I used a set from Stampin' Up! for the bus and colored it with my SU! markers.

Thanks for looking! If you have any questions, let me know!!!
Saturday, August 27, 2011
My latest Baby Shower
A couple of weekends ago, I hosted a baby shower for a dear friend of mine who will be moving really, really soon! :( Here are some of the goodies that I made. If you have any questions, please let me know. Thanks!!
Here is the diaper cake:
One of two main centerpieces: 


Here is the diaper cake:

One of two main centerpieces:

The favors and light decoration to greet guests:

The hospital door hanger:

The smaller centerpieces that decorated the house:

Washcloth bouquet with finger puppets:

Wednesday, August 10, 2011
PKS Let's Face it Friday Challenge--Shape Card
The latest Let's Face it Friday Challenge over at the Peachy Keen Stamps blog is a shape card. I have a friend who just bought her first house and I needed a card to go with her housewarming gift. This challenge was perfect for it!

Since I didn't win the faces in the last challenge (LOL), I used my Everyday Paper Dolls face assortment set for the face on the heart. I then covered the heart and the tulips with glossy accents to add some texture. I used liquid pearls for the door knob. If you have any questions, please let me know! Thanks for looking!
Supplies:
Paper: Stampin' Up!Ink: Stampin' Up!, Tim Holtz distress ink (walnut stain)
Cartridges: Create a Critter
Stamps: Everyday Paper Dolls (PKS)
Tuesday, August 2, 2011
PKS-Let's Face It Friday-So Punny!
Ok, I admit....this is my first time to create a card like this....ever. I really want to win the PKS Basic Paper Doll Assortment Face set!! It is so cute! I only have the Everyday Character Face Assortment and I NEED the Basic Face Assortment to use for all my paper doll and other creations!!! LOL!!!
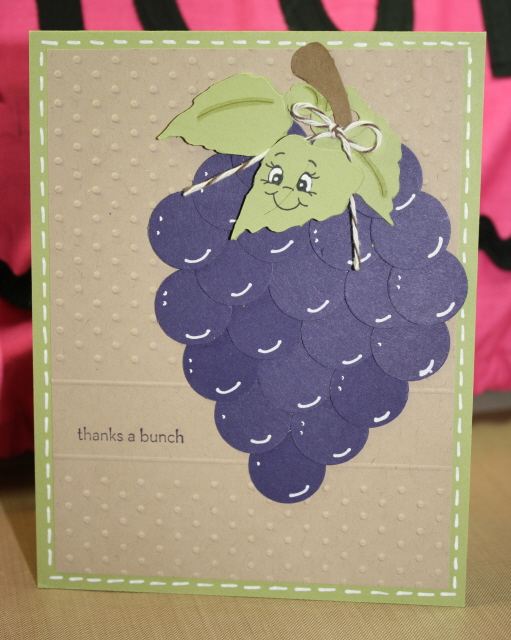
I am entering this card into the Let's Face It Friday-So Punny! Challenge over at the PKS challenge blog. For all the info, click HERE. All you have to do is link up a card using a pun sentiment and a PKS face stamp. I had no idea where to start, but I found this older Stampin' Up! set (One Smart Cookie) that I thought would be perfect. That's really where I got my idea. I looked for a bunch of grapes on my cricut cartridges, but I don't own a cartridge with a bunch of grapes! Oh no, what to do?!?! Improvise and make your own!! I punched the circles with a 3/4" circle punch and layered them together to look like a bunch of grapes. I cut the leaves from the 50 states cartridge and created my own stem. I tried out an embossing folder technique that I saw Christina do a couple of weeks ago. I think this card came out really cute!! I need to pull out those face assortment sets and use them more often. If my number gets chosen to win the PKS Basic Face Assortment set, I'll have more to choose from!!!! :) Thanks for looking!!!
Thursday, July 28, 2011
PKS Challenge 57
I created this card for the Peachy Keen Stamps challenge #57. This one has a bit of a twist on it. We were given a sketch to follow and a color combination that we had to use. HERE are the details for the challenge.

This is not my usual color choices but I really enjoyed putting these together.

I did use the colors in the challenge, but as usual, my photography skills do no justice for the colors. I began by embossing the flowers with black embossing powder onto some cardstock vellum. I then used a copic marker for the coral colored flower. However, I quickly realized that copics don't do well with vellum and embossing powder. For the green, I used a certainly celery SU! marker and colored the flower. I then took the new SU! color pool party and sponged the entire back of the vellum. I then backed it with white card stock and then placed it on a coral card base. If you have any questions, please let me know! Thanks for looking!
Thursday, July 21, 2011
Caleb's Birthday Cards
For my friend's shower, she wanted one of her guests to write a birthday message for each year until he is 18. I think this is a wonderful idea! We will pass the cards out to the guests, they will write a personalized message to Caleb, and seal the envelope. His mother will give him his cards each year on his birthday.

Since these are going to be "special" birthday cards, I wanted them to match so that Caleb would always know that these are his "special" birthday cards. I used my Create a Critter cricut cartridge for the cupcake and the divine swirls cuttlebug embossing folder for the cupcake frosting. I pulled ot my AWESOME copic marker and colored the numbers to match the card patterned paper. All of the patterned paper is from Stampin' Up! Since I used my Gypsy, it was really easy to weld the candle numbers to the cupcake base and then cut everything out to match perfectly!! Thanks for looking! If you have any questions, please let me know!!!
Here are a couple of close ups!


If you click on the group pictures, they will show up larger.


Keeping Me Busy
I have been working on a baby shower for this little guy and his mommy.

I can't post pictures just yet because his mommy visits my blog and I want it to be a surprise for her!! I can't wait until her shower! I just love doing baby showers!
Tuesday, July 12, 2011
Throwback Thursday Challenge

Ok, so this is the second challenge that I have ever entered and it is proving to be very fun. I am entering this card into Emma's challenge from My Creative Time. She challenged us to use the Wild Card cricut cartridge. Since it feels like forever since I've used this cartridge, I was game!! We also had to incorporate embossing. I got out the brayer and inked up the zebra print sizziz folder (I actually think it might be tiger stripes, but works either way LOL) with Melon Mambo SU ink. I guess I was moving the paper, but after three tries, I gave up on that technique. I flipped on of the circles over and colored in the lines with my marker. I'm pleased with how it turned out and using the marker actually made the pink a bit darker (which I like). I also used my I-Rock tool with rhinestones on either side of the greeting. If you want to enter the challenge, you have until tomorrow. Happy creating!! Thanks for looking!!!
Monday, July 11, 2011
Convention Goodies!

Thursday, July 7, 2011


Subscribe to:
Posts (Atom)


